Web Server Installation
This page contains instructions for installation of the web server. If you just want to run scripts from the command line, please refer to the simpler instructions in Basic Installation.
The web application is designed to run on a local server running in the home, and is not appropriate for a website on the open internet. The underlying Python code uses the LIFX LAN Protocol, which works entirely over an internal WiFi network. This was a deliberate design decision, in an effort to promote security and simplicity.
The focus here is installation on a Raspberry Pi. However, these instructions should be fairly accurate for a typical Debian-based system.
A key goal for this project is to produce something that’s genuinely useful on an everyday basis. For me, that’s a local web server which is available 24/7. This means it should be cheap to buy and consume a small amount of power.
The Raspberry Pi Zero 2 W has been a good fit for someone’s everyday use. Other Raspberry Pi models will work as well, and even the newer, faster models are reasonably priced.
The server runs well on a default installation of Raspberry Pi OS. It also runs on generic Debian and other standard Linux distributions, as long as the machnine’s version of Python is recent enough. It should also run on Windows and MacOS, although we currently don’t actively test on those platforms.
A typical installation involves this chain of communication:
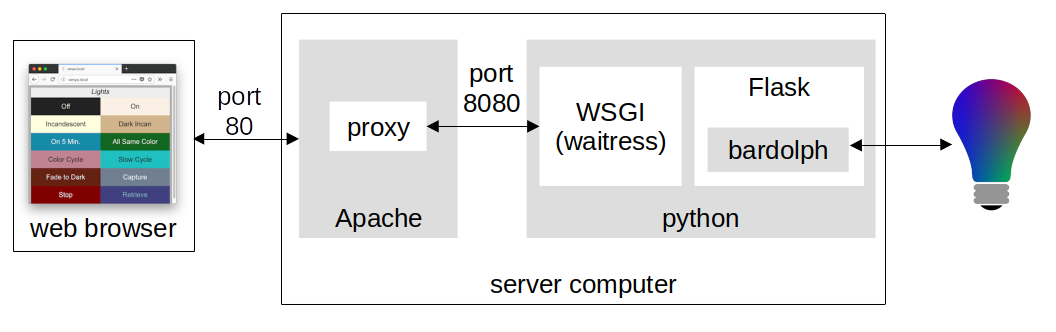
The user runs a browser on a phone, TV, or computer, which requests web pages from the local server, typically a Raspberry Pi or similar device.
On the server computer, Apache manages requests for web pages that come in over port 80 via HTTP.
Within Apache, a proxy module forwards incoming requests to a python process via port 8080.
That python process runs waitress, a thin layer which implements the WSGI protocol. This gives the python program a simple and secure means of implementing a browser-based application, without having to worry about the low-level complexities of network protocols.
Inside that same python process, waitress forwards requests for web pages to Flask, which is a platform for python programs to implement the actual UI seen by the user. Within that UI code, clicks on the web page are translated to calls into Bardolph.
Bardolph, also within that python process, responds by executing scripts to control the light bulbs and other devices.
Note
Although this documentation covers the use of waitress for WSGI and Apache as the reverse proxy, you should feel free to use other implementations. Because reverse proxies and WSGI are well-established technologies, a variety of implementations are available for both of them. For more complete information, along with some suggestions for WSGI and HTML servers, We recommend reviewing this web page on the official Flask website: Deploying to Production.
O.S. Setup
This overview assumes you have already installed Raspberry Pi OS on your device. For more information, please refer to the software installation instructions on the official Raspberry Pi website, Getting Started.
Any recent version should be fine, and we would suggest accepting whichever one the installer recommends. However, if you’re trying to save space, you can choose the installation that does not have the desktop environment.
During the installation, make sure you enable WiFi and ssh on your device. The server will be able to run without a monitor or keyboard attached. For more information, see the Raspberry Pi remote access documentation.
If your device has a physical ethernet port, you can use a wired connection instead of WiFi, but it needs to be on the same network that the lights are on.
By default, Raspberry Pi OS already has a Python interpreter, so you won’t need to install it. This documentation uses the default raspberrypi hostname for the server.
Dedicated User
A special-purpose user is convenient for running the server. It provides you with a home directory for the Bardolph code, and allows you to tailor that user’s characteristics to running the server. Therefore, the next step is to create a user called lights.
sudo adduser lights
Note that this user doesn’t have any special privileges. In fact, we definitely recommend that you do not give that user sudo membership. This ensures that the Python code itself runs under a standard account, thus improving security.
HTTP Server Setup
The WSGI server can be accessed via a browser through HTTP on port 8080. However, it is strongly recommended that you use a reverse proxy implemented by a robust HTTP server that binds to port 80. To that end, these instructions cover use of the well-known Apache server.
If Apache is not already available, you should be able install it with your package manager. For example:
sudo apt update
sudo apt install apache2
After Apache has been installed, you will neeed to enable the reverse-proxy modules:
sudo a2enmod proxy
sudo a2enmod proxy_http
To configure the proxy modules, edit (using sudo) /etc/apache2/sites-available/000-default.conf to contain:
<VirtualHost *:80>
    # Other settings are already here by default. You can edit them as
    # necessary

    # Configure reverse proxy to the WSGI process.
    ProxyPreserveHost On
    ProxyPass "/" "http://127.0.0.1:8080/"
    ProxyPassReverse "/" "http://127.0.0.1:8080"
</VirtualHost>
For more information on using the web server, please see Web Frontend Server.
Restart The HTTP Server With The New Configuration
By default, the apache2 daemon will already be running. You need to restart it to enable the new configuration with:
sudo systemctl restart apache2
Download The Source Tree
Log In as lights
If you are using the recommended dedicated user lights, this is the point where you log in as that user.
Download Supporting Files
The web server relies on many non-Python files that are not part of the packaged distribution. As a result, you’ll need to clone the entire source tree. First, log in as the lights user, then:
git clone https://github.com/Bardolph-Automation-Inc/bardolph
Set Up a Virtual Environment
Log In as lights
If you are using the recommended dedicated user lights, you should also do these steps logged into that account.
Create the Virtual Environment
To facilitate the installation of the Python modules from PyPi, you will probably want to set up a virtual environment. Although we’re still experimenting with this, currently we recommend creating one in a directory named bardolph-venv.
To create the virtual environment, from your home directory as the `lights` user:
python -m venv bardolph-venv
The resulting directory structure will look like:
/home/lights/bardolph
/home/lights/bardolph-venv
The goal of this layout is to keep a clean separation between the application files and the rather complex file structure that venv creates.
Activating
Every time you want to work with anything Bardolph-related, you need to first activate the virtual environment. From the `lights` home directory:
source bardolph-venv/bin/activate
Whenever you run this command, you will notice that (bardolph-venv) has been prepended to your command-line prompt.
Install The Python Modules
Before proceeding, be sure that you have activated the virtual environment, as described in the previous section. Then, still logged in as the lights user:
pip install bardolph
After this intallation, the following shell scripts will be available whenever the virtual environment is activated.
lsc - Compile a light script into a Python program.
lsrun - Run a light script from the command line.
lscap - Capture the current state of all the lights on the network.
These commands are further documented in Command-Line Tools.
Testing the Installation
To do a quick sanity check:
lsrun -h
This should display a help screen. To make sure Bardolph is able to access your lights:
lscap
For every the device that is discovered, you will see a plain-text table of its current settings.
Flask Application Server
For this step, you should be logged in as user lights.
The HTTP server communicates with other devices on your network via HTTP on port 80. All of the program logic and the UI implemtation are in a web app, contained in a Python module. This app binds to port 8080, which is generally not accessible to other computers on the network.
That web app runs using the Flask framework for the user interface. That app is launched by waitress, which communicates with the app through the WSGI protocol. You can install these with:
pip install Flask waitress
Start the Application Server
You should do this as the lights user. From the source distribution directory, for example /home/lights/bardolph:
cd ~/bardolph
python -m web.start_wsgi
If all goes well, you should be able to access the home page. Typically, the URL will look like:
After a Reboot
Whenever you reboot the computer, you will need to start the WSGI process again. To do so, ssh to the server as user lights and:
cd ~/bardolph
python -m web.start_wsgi
If you are clever enough with Linux, you can probably set up an init script to do this. We’re investigatng this and will update these docs when it’s ready.
By default, Apache is launched when the system boots, so you should not need to manually start that process.
Stopping
This shouldn’t be necessary, but to stop (and, if you want, start) Apache, you can use one of these commands:
sudo systemctl stop apache2
sudo systemctl start apache2
sudo systemctl restart apache2
We don’t have an elegant way to stop the WSGI process, so, as the lights user:
killall python
or if you still have the session open in which the server is running, press Ctrl/C.
Running a Headless Server
If you are going to use this server on a regular, daily bais, you will most likely want to set up a so-called “headless” server. This is a device that has no keyboard, mouse, or monitor attached to it. All communication with that device occurs over the network, typically via ssh or HTTP.
To use this kind of set-up, you will typically:
Log in via ssh.
Launch the web server application.
Log out from the ssh session.
However, to log out cleanly while leaving the server application running, you will probably want to use either nohup or screen.
Running With nohup
The Linux nohup command starts a process and routes its stdout and stderr output to a file, by default named nohop.out. It also takes control of stdin, which means the process has no access to input from the keyboard. To use this technique, you start the web application as a background task within a nohup process.
For example, log in as the lights user, and:
source ~/bardolph-venv/bin/activate
cd ~/bardolph
nohup python -m web.start_wsgi &
exit
This will launch the WSGI server, which will keep running after you exit the shell.
To stop the server:
killall python
Running With screen
The screen utility is a popular way to run processes without staying logged in. The official site is https://www.gnu.org/software/screen. If it is not part of your distribution, you should be able to install it with
sudo apt install screen
From the command line:
screen
At that point, the utility will launch a new shell. During the start-up process you see some messaging, and can either read it all or just hit the Return key.
When you get the new shell:
source ~/bardolph-venv/bin/activate
cd ~/bardolph
python -m web.start_wsgi
After the server starts, you can exit the shell, leaving it running unattended. To do so, press Ctrl-A, followed by the letter “d” on your keyboard. This will “detach” from the shell. At that point, you can log out.
If you want to re-connect to that shell:
screen -r
This will reconnect to shell that’s running the web server application. To stop the process and shut down the server, you can just press Ctrl-C.
Note that the screen utility is very powerful, and has a lot of features which, while sometimes complicated, are quite useful. Although these added capabilities are not necessary to run the Bardolph web server, we recommend that you spend some time reading the documentation or one of the many tuturials that are available.
Running The Server in Debug Mode
If you start digging into customizing the web application, chances are that you may want to run Flask in debug mode. This can be done with:
source ~/bardolph-venv/bin/activate
cd ~/bardolph
flask --app web.flask_module:create_app run
If the application launches successfullly, you can access the website with
Note that port 5000 is not open to the outside, and you will not be able to access his URL from any other machine on your network. You can access it from only localhost.
Confiuguration For Logging To Files
By default, log output from the Bardolph module will be sent to the terminal session where you start the server. However, in practice, you may want to use a more standardized log configuration that sends all logging output to a file, typically under the /var/log directory. With these stipe, the log output will be written to file /var/log/lights/lights.log.
Log in As sudo-Enabled User
This is a step you take as a user that has sudo access.
Set Up Directory Structure
The web site configuration files in the source tree specify that all of the logs reside in the directory /var/log/lights. Therefore, as part of your setup, you need to do the following:
sudo mkdir /var/log/lights
sudo chown lights:lights /var/log/lights
sudo chmod 755 /var/log/lights
This allows processes owned by the lights meta-user to write all of the logs in one place.
Start The Server Using .ini File
Before starting the server, you need to activate the use of the .ini file by setting the BARDOLPH_INI environment variable. Therefore, to start the server:
export BARDOLPH_INI=log_to_file.ini
source ~/bardolph-venv/bin/activate
cd ~/bardolph
python -m web.start_wsgi
After the server starts, there should a file /var/log/lights/lights.log. It may be empty, unless there was some kind of error.
After Installation
This section covers some activities that are done post-installation.
Upgrading to the Latest Version
From time to time, the package will be updated with fixes and new features. To upgrade to the latest verstion:
source ~/bardolph-venv/bin/activate
pip install -U bardolph
Upgrading lifxlan to the Latest Version
If you have a newly-released device that hasn’t been on the market for very long, you may need to install the lifxlan library from the latest source code. For more information, see Installing the lifxlan Library in the basic installation instructions.
Uninstalling
Uninstall with:
pip uninstall bardolph
Aside from that un-install, you can also recursively delete the source tree and the directory containing the virtual environment. . You can also remove the dependencies:
pip uninstall bardolph Flask waitress lifxlan