Language Reference
This page describes the syntax and capabilities of Bardolph’s scripting language. For information on how to run a script, please see Command-Line Tools.
Internally, launching a script is a two-step process. First, a parser reads the source file and compiles it into a sequence of encoded instructions. Next, a simple virtual machine (VM) executes those instructions. A job-control facility maintains a queue, allowing execution of a sequence of compiled scripts.
Syntax
A script is a plain-text file in which all whitespace is equivalent. You can format it with tabs or even put the entire script on a single line. Comments begin with the ‘#’ character and continue to the end of the line. All keywords are in lower-case text. By convention, script file names have the “.ls” extension, meaning “lightbulb script”.
Here’s an example, showing a comment:
# comment
hue 360           # red
saturation 100    # 100% saturation
brightness 60.0   # 60% brightness
kelvin 2700

set all
If you were to save this in a file called red.ls, you would then run it with:
lsrun red.ls
This script sets the colors of all known lights to a bright shade of red.
Note that the set command is what actually causes the lights to adopt the
new settings and change their colors. The all parameter causes the given
settings to be applied to all of the lights found on the network.
Registers
A script sets the color and brightness of the lights, over a given interval,
by specifying 5 numbers: hue, saturation, brightness, kelvin,
and duration. During execution, the Bardolph virtual machine sends these
settings to the lights. These global variables are referred to as registers.
The value you supply for hue is an angle expressed in
in degrees, normally between 0 and 360. The values for saturation
and brightness are treated as percentages, while kelvin is considered
a temperature in °K. The value for duration is expressed in
seconds, and tells the light how long to take to transition from its current
state to the one you are now specifying. If you never supply a value for
duration, it defaults to zero, and transitions occur instantaneously.
All of these numbers except hue must be positive, and may be floating-point
values. Percentages above 100 are considered invalid. Angles for hue
greater than or equal to 360 are normalized to a number less
than 360 by modulo arithmetic.
One easy way to see what colors correspond to these numbers is to use the color wheel in the LIFX mobile app. In that app, you can see values for hue, saturation, and brightness in real time. If you wanted to reproduce a color, you could put the values displayed by the app into a script.
Note
The term color is somewhat ambiguous. Intuitively, you may consider brightness (intensity) to be separate from a bulb’s color. However, for simplicity here, “color” always refers to both the tone of the light and its intensity. Therefore, in this documentation, “setting the color” of a light means that you are specifying the frequency as well as the brightness of the light that the device produces.
Throughout this documentation, color setting is defined as any of
the parameters that control this so-called color. The available
color settings are hue, saturation, brightness, and kelvin.
When a setting isn’t specified a second time, the VM uses the existing value.
For example, the following reuses numbers for saturation, brightness,
and kelvin:
hue 120 saturation 100 brightness 50 kelvin 2700 set all
hue 180 set all
This script will:
Set all lights to HSBK of 120, 100, 50, 2700
Set all lights to HSBK of 180, 100, 50, 2700
Any uninitialized light value defaults to hue, saturation,
brightness, and kelvin all equal to zero. If you send that default HSBK
[0, 0, 0, 0] to a light, the bulb goes dark, due to the brightness of 0.
Names
As described below, the language supports various features that make use of symbolic names. Examples of this are variables and macros. A valid name starts with either an underscore or alphabetic character. The rest of the name can contain letters, numbers, and underscores. For example:
x
_living_room
Bulb_80
Names are handled with case-sensitive logic.
Individual Lights
Scripts can control individual lights by name. For example, if you have a light named “Table”, you can set its color with:
hue 120 saturation 100 brightness 75 kelvin 2700
set "Table"
If you look at the properties of a light in the LIFX mobile app, you can get the name of a light. You use that name any script that controls that light. he name of the light that you see in the LIFX app A light’s name is configured when you do initial setup with the LIFX software.
When they appear in a script, bulb names must be in quotation marks. They can contain spaces, but may not contain a linefeed. For example:
# Ok
on "Chair Side"

# Error
on "Chair
Side"
If a script contains a name for a light that has not been discovered or is otherwise unavailable, an error is sent to the log, but execution of the script continues.
Power Command
The commands to turn the lights on or off resemble the set command:
off all
on "Table"
This turns off all the lights, and turns on the one named “Table”.
The on and off commands have no effect on the color of the lights.
When on executes, each light will have whatever its color was when
it was turned off. If a light is already on or off, an otherwise
redundant power operation will have no visible effect, although the
VM does send the power command to the bulbs.
When applied to a multi-zone light, the entire device is powered on or off; you can’t set the power for individual zones (although you can set the brightness to zero).
Multizone Lights
Multizone lights are an arrangement of LED’s in a single line. That line can
be one straight line, a line with angles, or a curve, depending on the nature
of the device. The set command works the same, but you can limit which zones
it affects. It can set all of them to the same color, set the color of a single
zone, or set it for a range of them.
Examples are the “Light Beams” (https://www.lifx.com/collections/light-beams), “Lightstrips” (https://www.lifx.com/collections/lightstrips), and “Neon Flex” (https://www.lifx.com/collections/neon-flex).
For example, assume you have a Lightstrip named “Strip”. you can set the entire strip to one color with:
hue 150 saturation 100 brightness 50 kelvin 2700 duration 1.5
set "Strip"
To set only one zone, add a zone clause with a single number:
set "Strip" zone 5
To set multiple zones, specify a range with starting and ending zone numbers:
set "Strip" zone 0 8
Note that the zone numbers start with zero. If you try use a zone on a light that doesn’t have that capability, an error will be sent to the log, and the light will not be accessed. Unlike Python ranges, the numbers are inclusive. For example, zone 1 3 would include zones 1, 2, and 3.
Matrix Lights
This section covers LIFX matrix lights. Note that it applies only to lights that are “Polychrome” and capable of changing color. Scripts for “White to Warm” lights are basically the same as those for any other bulb model.
Examples of matrix lights are the “Tube Light” (https://www.lifx.com/products/tube-smart-light), and the “Candle” (https://www.lifx.com/products/candle-smart-light-e26)
This has been tested with the Candle E12 and the Tube E26 bulbs. If some of the other “Polychrome” devices, such as the ceiling lights, support the published API, we’ll try to test and fix the implementation for those, as well.
The underlying API for these devices is covered in the LIFX documentaion. A Candle bulb is divided vertically into 6 rows, while a Tube bulb has 11 rows. Going around the axis of either type of bulb, there are 5 columns.
Note that for both types of devices, row 0, which is at the tip of the bulb, has only 2 LED cells, which occupy columns 0 and 1. You can still assign values to the other cells in that row; they are simply ignored.
Candle Layout
The diagram below illustrates how the areas of a Candle bulb are addressed:
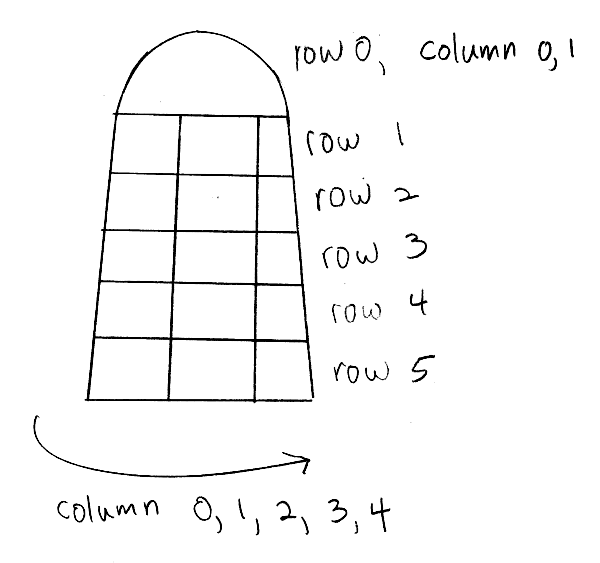
Candle Bulb Layout
Values for row must be between 0 and 5, and column must be between
0 and 4.. The columns wrap around the bulb, but aside from running a script,
there’s no obvious way to know where the LED’s centered on column 0 are
positioned.
Tube Layout
This diagram below illustrates how the areas of a Tube are addressed:
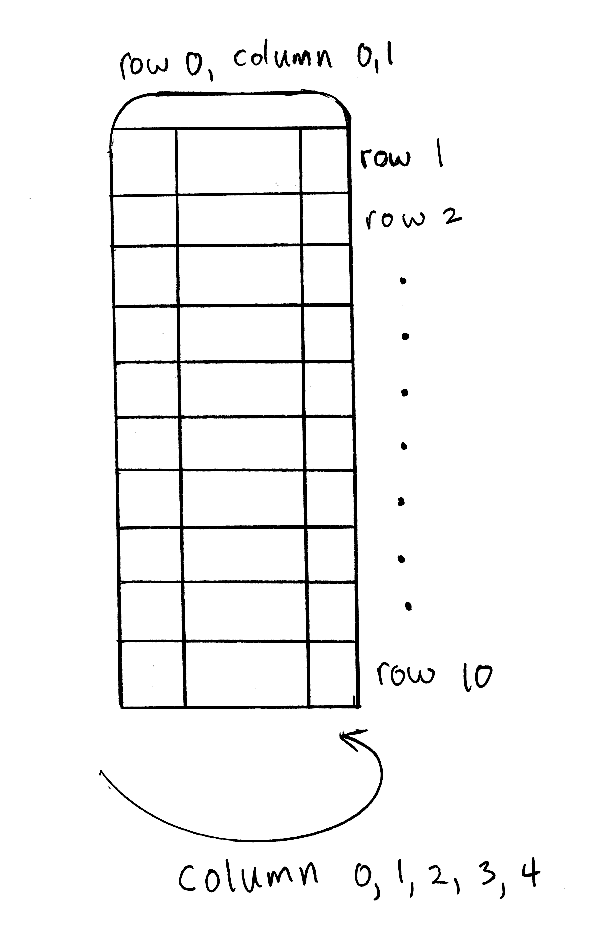
Tube Bulb Layout
In this case, values for row can be between 0 and 10, but column must
still be between 0 and 4.
Note
Given the physical construction of these bulbs, it may be difficult to pick out individual cells. As far as I can tell, because the LED array is contained in a white diffuser, the light from the various LED’s tends to get blended, which I believe is intentional.
In order to set a matrix bulb’s color you need to:
Set the default color.
Set the colors for the desired parts of the bulb.
If you don’t set the defult, then hue, saturation, brightness, and
kelvin will all be zero.
For example:
hue 220 saturation 75 brightness 15 kelvin 2700
set default

hue 100 brightness 75
set "Candle" row 1 column 3
This code will set the entire bulb’s hue to 220, with the exception of the
cell at row 1, column 3. Note the large difference in brightness, which
will make it easier to distinguish the individual cell if you run this code.
When two numbers are given, they are assumed to be a range, which is inclusive. For example, row 2 4 specifies rows 2, 3, and 4.
Whenever the ending value is not supplied, it is given the starting value. For example:
set "Tube" row 1 1

# Equivalent:
set "Tube" row 1
If you supply only column or only row, the full range (0 through 5
for row, 0 through 4 for column) of the unspecified parameter is
assumed:
set "Candle" row 1 2
set "Candle" column 1 3

# Equivalent:
set "Candle" row 1 2 column 0 4
set "Candle" row 0 5 column 1 3
Although the examples so far have row before column, that order is not
required:
set "Candle" row 1 2 column 3 4

# Equivalent:
set "Candle" column 3 4 row 1 2
Full Syntax for Matrix Bulbs
In the examples so far, each set contains a single command. This is limiting
because you can set only one area of the bulb’s body section. A more powerful
syntax uses begin and end to contain a collection of settings that
are sent as a unit that updates the entire bulb. For example, to set a few
different areas of the bulb:
hue 240 saturation 75 brightness 25 kelvin 2200
set default

set "Candle"
begin
    hue 320
    stage row 1 2 column 1 2

    hue 300
    stage row 3
    stage row 4
end
The stage keyword is used here because no communication with the bulb occurs
within the begin - end block. Instead, an internal data structure gets
built as stage commands are executed.
When end is reached, the virtual machine sends the entire result to the bulb
as a block of data. Any cell that has not been accessed in the begin
/ end clause receives the default. This means that every cell in the entire
bulb receives a new setting. This behavior is guided by the underlying LIFX API
supported by multi-colored bulbs.
As with the shorter syntax, both row and column are optional. Here are
some examples:
# Set the entire bulb to the same color.
hue 180
set "Tube"


# Prepare for subsequent changbes by setting the default.
hue 120 saturation 75 brightness 75 kelvin 2700
set default


# Set column 3 in all rows to the same color. The rest of the bulb gets
# the default.
hue 190
set "Tube"
begin
    stage column 3
end

# Set a single element of the bulb.
set "Tube"
begin
    hue 200
    stage row 8 column 3
end

# Set a square area and the tip
hue 210
set "Tube"
begin
    stage row 1 2 column 3 4

    # tip
    stage row 0
end
As another example, here is a script that gives the bulb a gradient of colors. In this example, it is not necessary to set the default, because all of the cells get staged:
saturation 100 brightness 50 kelvin 2500

set "Candle"
begin
    hue 120
    stage row 0
    hue 150
    stage row 1
    hue 180
    stage row 2
    hue 210
    stage row 3
    hue 240
    stage row 4
    hue 270
    stage row 5
end
Of course, this can be accomplished with more succinct code:
saturation 100 brightness 50 kelvin 2500

hue 120
set "Candle"
begin
    repeat with row_num from 0 to 5
    begin
        stage row row_num
        hue (hue + 30)
    end
end
Timing Color Changes
Scripts can contain time delays and durations, both of which are are expressed
in seconds. A time value designates the amount of time to wait before
transmitting the next command to the lights. The duration value is passed
through to the bulbs, and its interpretation is defined by the
LIFX API. Basically, by setting
duration, you determine how long it should take the bulb to transition to
its new state. For example:
off all time 5 duration 1.5 on all off "Table"
This will:
Immediately turn off all lights instantaneously.
Wait 5 seconds.
Turn on all the lights, but ramp up the brightness over a period of 1.5 seconds.
Wait 5 seconds again.
Dim down the light named “Table” over a period of 1.5 seconds until it is off.
The underlying API has a precision down to milliseconds. For example, all
digits are significant in a time parameter of 1.234. However, in
practice, the host computer or underlying threading support built into the
Python runtime may not be able to keep up. For that reason, I recommend that
you do not try to use a time or duration that is less than 0.1 seconds.
As mentioned above, the existing values for time and duration are
re-used with each command. In this example, time is set only
once, but there will be the same delay between every action.
Multiple Lights Using and
If you want to set multiple lights at the same time, you can chain them using
and
# Uses "and": both go on at the same time after 2 seconds.
time 2 on "Table" and "Chair Side"
This script will:
Wait 2 seconds.
Turn both lights on simultaneously.
This contrasts with:
# Does not use "and": 2-second delay before the second light is turned on.
time 2
on "Table"
on "Lamp"
This script will:
Wait 2 seconds.
Turn on the light named “Table”.
Wait 2 seconds.
Turn on the light named “Lamp”.
The and keyword works with set, on, and off.
If a script specifies zones, the and comes after the zone numbers. This
can be convenient for coordinating a multi-zone light with single-zone
bulbs. For example, with a multi-zone light named “Strip” and a bulb named
“Table”
hue 120 saturation 75 brightness 75 kelvin 2700 duration 1.5
set "Strip" zone 0 5 and "Table"
Here’s an example of simultaneously setting multiple zones on the same light at the same time:
set "Strip" zone 2 and "Strip" zone 13 15
How Time Is Measured
It’s important to note that delay time calculations are based on when the script started. The delay is not calculated based on the completion time of the previous instruction.
For example:
time 2
on all
# Do a lot of slow stuff.
off all
The “off” instruction will be executed 2 seconds from the time that the script was started, and the “off” instruction 4 seconds from that start time.
If part of a script takes a long time to execute, the wait time may elapse before the virtual machine is ready for the next instruction. In this case, that instruction gets executed without any timer delay. If delay times are too short for the program to keep up, it will simply keep executing instructions as fast as it can.
Wait for Time of Day
Instead of waiting for a delay to elapse, you can specify the specific time
that an action occurs, using the at modifier with the time command. For
example, to turn on all the lights at 8:00 a.m.:
time at 8:00 on all
All times are specified using a 24-hour clock, with midnight at 0:00. In this documentation, the parameter supplied in the script is called a time pattern.
A time pattern can contain wildcards to match more than one possible time. For example, to turn on the lights on the hour and turn them off on the half-hour
time at *:00 on all time at *:30 off all
A time pattern can have placeholders for one or two digits with an asterisk. Here are some examples of valid patterns:
2*:00 - matches 21:00, 22:00, and 23:00.
1:*5 - matches 1:05, 1:15, 1:25, 1:35, 1:45 and 1:55.
*:30 - matches on the half-hour.
These are not valid patterns:
* or *:* - matches anything and is therefore meaningless.
12:8* - not a valid time.
**:08 - only one asterisk is necessary.
12:5 - minutes need to be expressed as two digits.
Note that the language is procedural, not declarative. This means that the script is executed from top to bottom. For example, assume you run this script at 8:00 a.m.:
time at 10:00 on all
time at 9:00 off all
This will turn on all the lights at 10:00 a.m., wait 23 hours, and turn them off again the next day.
You can combine patterns to create more complicated behavior. For example, this will turn on the lights the next time it’s either 15 or 45 minutes past the hour:
time at *:15 or *:45 on all
After a scheduled wait, the delay timer is essentially reset. For example:
time at 12:00 on all
time 60 off all
This would turn on all the lights at noon and then turm them off 60 seconds later, which would be at 12:01 p.m.
Pause for Keypress
Instead of using timed delays, a script can wait for a key to be pressed. For example, to simulate a manual traffic light
saturation 100 brightness 80
hue 120 set all
pause hue 50 set all
pause hue 360 set all
This script will:
Set all the lights to green (hue 120).
Wait for the user to press a key.
Set all the lights to yellow (50).
Wait for a keypress.
Turn the lights red (360).
A script can contain both pauses and timed delays. After a pause, the delay timer is reset. For example:
time at 12:00 on all
pause off all
time 10 on all
This script turns on all the lights at 12:00 noon. It then waits for the user to press a key at the keyboard. When a key has been pressed, it turns off all the lights, waits 10 s, and turns them on again.
Wait With No Action
To wait for the next time interval without doing anything:
wait
This can be useful to keep a script active until the last command has been executed. For example:
time 0 hue 120 saturation 90 brightness 50 kelvin 2700
duration 200
set all
time 200
wait
In this example, the set command will take 200 seconds to fully take
effect. The script adds a 200-second wait to keep it from exiting before
that slow set completes. If a script is waiting in the queue, this
prevents that next script from starting before the 200-second duration has
elapsed.
Groups and Locations
The set, on, and off commands can be applied to groups and
locations. For example, if you have a location called “Living Room”, you
can turn them on and set them all to the same color with:
on location "Living Room"
hue 120 saturation 80 brightness 75 kelvin 2700
set location "Living Room"
Continuing the same example, you can also set the color of all the lights in the “Reading Lights” group with:
set group "Reading Lights"
You can combine lights, groups, and locations with the and keyword:
set location "Living Room" and "Table" and group "Reading Lights"
Macro Definitions
A macro can be defined to hold a commonly-used name or number:
define blue 240 define deep 100 define dim 20
define gradual 4
define ceiling "Ceiling Light in the Living Room"
hue blue saturation deep brightness dim duration gradual
set ceiling
Because a macro is defined at compile-time, the value bound to it must be a single number or a quoted string.
A macro can be used for a light name or a value to be used to set a parameter. It can also be used as a zone number with multi-zone lights:
define my_light "Chair Side"
hue 120 saturation 80 brightness 50 kelvin 2700
set my_light

define zone_1 5 define zone_2 10
set "Strip" zone zone_1 zone_2
Macros may refer to other existing macros:
define blue 240
define b blue
A macro can be defined only once, which makes it suitable for constants:
define blue 240
define blue 260 # Error: already defined.
Variables
A variable is somewhat similar to a macro, in that it can hold a value. However, a variable’s contents can be replaced with a new value at run-time. In addition, the current value for a color setting can be copied into a variable. The syntax is:
assign variable value
A variable can contain a number, a string, or a time pattern. Once it has been initialized, it can be used as a name or a value for a color or time setting. For example:
assign the_light "Chair"
on the_light

assign the_room "Living Room"
off group the_room

assign dinner_time 17:00
time at dinner_time on "Table"
An existing variable can be assigned to another. A variable can also get a copy of a color setting. For example:
assign x 120
assign y x     # y now contains 120
hue 240
assign y hue   # y now contains 240
Assignment of one variable to another has by-value semantics:
assign x 120
assign y x
assign x 240    # y still contains 120
hue y           # Sets hue to 120.
In this example, y has an independent copy of the original value of x, even after x has been given a new value.
Mathematical and Logical Expressions
An expression can be used wherever a number or truth value is needed. For example, to put 5 + 4 into x:
assign x 5 + 4
For readability, you may want to use parentheses:
assign x (5 + 4)
Logical expressions can be used with if:
if x > 5 off all
The following mathematical operators are available:
+addition-subtraction or negative*multiplication/division%modulo^power of<,<=less than, less than or equal to>,>=greater than, greater than or equal to==equals!=not equal to
Logical operators are available as well:
&&and||or!not
Some examples of expressions:
assign a 45 * -3
assign b (4 + 5) / 3
assign h a^2 + b^2

if a > 0 && b != 4 || h < 5
begin
    on all
end

if ! (a==0 || b==0)
    off all
Note that * and / have a higher precedence than + and -. The
&& operator has a higher precedence than ||.
assign a 3 + 4 * 5    # a = 23
assign b (3 + 4) * 5  # b = 35

if 5 > 1 || 10 < 100 && 20 == 30    # true
    on all

if 5 > 1 || (10 < 100 && 20 == 30)  # true (parentheses are unnecessary)
    on all

if (5 > 1 || 10 < 100) && 20 == 30  # false
    off all
Numerical values in a logical context are coerced to booleans, where 0 is false, and any other value is true.
Referencing Registers
Registers can provide values:
brightness brightness * 1.1

assign double_brt brightness * 2
However, registers (hue, saturation, brightness, kelvin,
time and duration) can not be used as values for zone, row,
or column.
# None of this will work, because hue and brightness are registers.

set "Candle" row hue           # Error: using register hue as a row
set "Strip" zone brightness    # Error: using register brightness as a zone
Routine and Function Definitions
A subprogram, hereafter called a routine, can be defined as a sequence of commands. Here’s a simple exmple of a routine being defined and called:
define shut_off_all off all
shut_off_all
A routine can have one or more parameters if the name is followed by the with
keyword:
define set_mz with mz_light mz_zone
  set mz_light zone mz_zone

set_mz "Strip" 7
Return Values
A routine can return a value and exit, becoming a function. This is done
with the return keyword. A routine can return either a string or a number.
For example:
define increment with x
begin
    return x + 1
end
To invoke and use a function, use square brackets. For example:
define average with a b
begin
    return (a + b) / 2
end

print [average 100 200]
A routine call can be passed as a parameter. The called routine must already be defined; there currently is no support for forward declarations. As noted above, the parameters are passed by value:
define light_brightness with light_name
begin
    get light_name
    return brightness
end

define half_bright with brt light_name
begin
    brightness brt / 2
    set light_name
end

half_bright [light_brightness "Lamp"] "Top"
This code obtains the brightness of the bulb named “Lamp”, divides it by 2, and sets the brightness of the bulb “Top” to the dimmer value.
The return value of a routine may be ignored as long as the call is not contained in square brackets:
# Ok: return value ignored, no brackets
set_mz "Strip" 7

# Error: contained in brackets but not used.
[set_mz "Strip" 7]

# Ok: return value used, contained in brackets.
assign x [set_mz "Strip" 7]

# Error: attempt to use return value without brackets.
assign x set_mz "Strip" 7
If a routine contains multiple commands, they need to be contained
in begin and end keywords:
  define living_room_off
  begin
      duration 1.5
      off group "Living Room"
  end

  define off_3_seconds with the_light
  begin
      duration 3
      off the_light
  end

living_room_off
off_3_seconds "Chair"
A routine may not be re-defined. Routine definitions may not be nested:
define a_routine set "Chair"
define a_routine set "Table"  # Error: already defined.

define outer
begin
    # Error: nested definition not allowed.
    define inner on all
end
Variables defined inside a routine are local and go out of scope when the routine returns. Because parameters are passed by value, assignment to a parameter overwrites the local copy but does not affect any variable outside of the routine:
define do_brightness with x
begin
    assign x 50    # Overwrite the parameter
    brightness x   # Set brightness to 50.
end

assign y 100
do_brightness y    # Call do_brightness with 100
saturation y       # Set saturation to 100

saturation x       # Error: x no longer exists
Variables assigned outside of a routine are considered global and are both readable and writeable in all scopes:
assign y 100

define set_global
begin
  assign y 50
end

set_global
saturation y   # Set saturation to 50.
However, if a parameter has the same name as a global variable, the outer instance becomes hidden and is inaccessible in the entire body of the routine:
assign z 100

define set_hue_plus with z
begin
    # Global variable z is invisible here.
    assign z (z + 10)
    hue z
end

# Sets hue to 35
set_hue_plus 25

# Global variable z still contains 100; sets saturation to 100
saturation z
Built-In Functions
Some mathematical and utility functions are available as part of the standard run-time.
Built-In Mathematical Functions
A small number of built-in functions is available for simple mathematical operations. They are called with the same syntax utilized by user-defined functions. For example:
assign brt [round (brightness / 5)]
[abs x]
This returns the absolute value of x.
Examples |
|
|---|---|
Call |
Returns |
[abs 1] |
1 |
[abs -1] |
1 |
[abs 0] |
0 |
[ceil x]
This returns the smallest integer that is greater than or equal to x.
Examples |
|
|---|---|
Call |
Returns |
[ceil 1.0] |
1 |
[ceil 1.01] |
2 |
[ceil -1.5] |
1 |
[cycle theta]
The function normalizes an angle such that the result is between 0
and 360 degrees. This is useful in an infinite loop where you keep adding or
subtracting to a value for hue. For example:
hue 0

repeat
begin
    hue [cycle hue + 120]
    set all
end
In this example, hue will be set to 0, 120, and 240. After that, when a
value of 360 gets passed into the cycle function, it returns 0,
effectively restarting the angle. This allows an infinite loop to keep adding to
an angle with no risk of overflow.
Examples |
|
|---|---|
Call |
Returns |
[cycle 355] |
355 |
[cycle 365] |
5 |
[cycle -10] |
350 |
[cycle 360] |
0 |
[cycle 3607] |
7 |
[floor x]
This returns the largest integer that is less than or equal to x.
Examples |
|
|---|---|
Call |
Returns |
[floor 1.0] |
1 |
[floor 2.1] |
2 |
[floor -1.6] |
-2 |
[random min max]
Return a random integer n such that min ≤ n ≤ max. For example, to set
brightness to a random percentage:
brightness [random 1 100]
[round x]
Rounds off x to the nearest integer.
Examples |
|
|---|---|
Call |
Returns |
[round 1.1] |
1 |
[1.5] |
2 |
[round -1.5] |
-2 |
[sqrt x]
This returns the square root of x. If x < 0, an error is sent to the log, and the function returns 0.
Examples |
||
|---|---|---|
Call |
Returns |
Notes |
[sqrt 4] |
2 |
|
[sqrt -9] |
0 |
Error message sent to log. |
Trigonometric: [sin theta], [cos theta], [tan theta]
These are all trigonometric functions. In all cases, theta is an angle measured in degrees.
Examples |
|
|---|---|
Call |
Returns |
[sin 30] |
0.5 |
[cos 30] |
0.866 |
[tan 45] |
1.0 |
Note that for documentation purposes, the above return values have been rounded.
Trigonometric: [asin theta], [acos theta], [atan theta]
These are all trigonometric functions. In all cases, the returned value is an angle measured in degrees.
Examples |
|
|---|---|
Call |
Returns |
[asin 0.5] |
30 |
[acos 0.866] |
30 |
[atan 1] |
45 |
Note that for documentation purposes, the above parameter and return values have been rounded.
[trunc x]
Truncates the fraction from x.
Examples |
|
|---|---|
Call |
Returns |
[trunc 1.1] |
1 |
[trunc 1.5] |
1 |
[trunc -1.5] |
1 |
Other Built-in Functions
Over time, other functions may be added here. For now, there is only one non-mathematical function supplied as part of the run-time library.
[query topic name]
Retrieve information about a light’s built-in features. The information to retrieve is specified as a string in topic and the light is specified by name. For example, to find out if a light named “Desk Lamp” is capable of displaying color:
if [query "is-color" "Desk Lamp"]
begin
    hue 120
    saturation 90
    brightness 90
    kelvin 2000
end
else
begin
    brightness 50
    kelvin 2700
end

set "Desk Lamp"
The following queries are currently available. Note that “matrix light” refers to a “Candle” or “Tube” type of light.
Queries |
|
|---|---|
Topic |
Returns |
“is-color” |
1 if the light is “Color”, 0 if it is “White”. |
“is-matrix” |
1 if it is a matrix light, 0 otherwise |
“is-multizone” |
1 if the light is a “Lightstrip”, “Beam”, etc., 0 otherwise |
“height” |
How many rows a light has. Useful only for matrix lights. |
“width” |
Multizone light: how many zones. Matrix light: how many columns. |
A simple bulb has a height and width of one. A strip light has a height of one.
Conditionals
A conditional consists of the if keyword, followed by an expression and
one or more commands. It can also have one or more else clauses:
if x < 5 off all

get "Top"
if hue < 100
begin
    hue 100
    set "Top"
end

if x >= 5
begin
    on all
    hue 120 set all
end
else
begin
    off all
end

if x >= 5
begin
    on all
    hue 120 set all
end
else if x < 0
    off all
else
begin
    saturation 25
end
Repeat Loops
Infinite Loop
An infinitely repeating loop looks like:
repeat
begin
    on all
    off all
end
Thoretically, this loop will run forever. However, the job control for the VM is designed to support graceful cutoff of a script’s execution. For ambient interior lighting, this is expected to be a common use case.
While Loop
Use repeat while for a loop based on a logical condition:
repeat while brightness < 50
begin
    brightness (brightness + 0.1)
    set all
end
Counted Loop
To repeat a loop a given number of times:
repeat 10
begin
    on all
    off all
end
To repeat a loop a given number of times using a range of values:
repeat with brt from 1 to 100
begin
    brightness brt
    set all
end
This code will execute the loop 100 times.
Interpolation in Loops
Interpolation of values in a loop allows you to choose the start and end points for a setting and the number of steps to take in between. For example, to give a light a hue of 120, and then gradually transition it to 180 in 5 steps:
repeat 5 with the_hue from 120 to 180
begin
    hue the_hue
    set all
end
In this example, the_hue will have values of 120, 135, 150, 165, and 180.
A special use case is to cycle the hue 360° over multiple iterations, perhaps in an infinite loop. The cycle keyword causes a value to loop around with modulo 360 logic, stopping one step short of a complete cycle. By starting at zero again, the iteration continues smoothly.
repeat
    repeat 4 with the_hue cycle
    begin
        hue the_hue
        set all
    end
The inner loop gets executed 4 times, with the_hue having values of 0, 90, 180, and 270, the difference being 90°. The next time the loop executes, it starts again at 0, which is equivalent to 360°. This effectively picks up where the previous loop left off.
You can also specify the starting point:
repeat 4 with the_hue cycle 45
# etc.
In this case, the_hue will have values of 45, 135, 225, and 315.
An arithmetic expression can take the place of any numeric value in a repeat loop:
assign x 7
repeat 5 + x with y from x * 4 to x * 6
...

# Functionally equivalent to:
repeat 12 with y from 28 to 42
...
Note that the loop range is calculated only once, before the iteration starts. In the following example, the loop is executed 5 times, even though light_count is modified in the body of the loop.
assign light_count 5
repeat light_count
begin
    # Doesn't affect the number of iterations.
    assign light_count 0
    ...
end
If you want to control the number of iterations dynamically, you can use a
repeat while construct.
Iterating Over Every Light
To iterate individually over all the lights:
# Turn on all the lights, one-by-one
repeat all as the_light
    on the_light
In this example, the_light is a variable that is initialized to the name of the next light before the body of the loop is executed.
A range of values can be applied to the lights. For example:
repeat all as bulb with brt from 10 to 30
begin
    brightness brt
    set bulb
end
In this case, the number of lights available determines what increment should be added to the index variable, brt. This allows you to distribute a set of values across some lights without knowing how many there are.
For example, if you have 3 lights, the above loop will be executed 3 times, with brt having values of 10, 20, and 30. If you have 5 lights, you get 5 iterations, with brt having values of 10, 15, 20, 25, and 30.
Iterating Over Groups or Locations
All groups or locations can be enumerated:
repeat group as the_group with the_hue from 120 to 180
begin
    hue the_hue
    set group the_group
end
Iterating Within Groups or Locations
To iterate over all the lights in a location or group:
repeat in location "Inside" as the_light
    on the_light

repeat in group "Background" as the_light with sat from 70 to 100
begin
    saturation sat
    set the_light
end
Mixing Lights, Groups, and Locations
Individual lights can be part of a list:
repeat
    in "Top" and "Middle" and "Table" as the_light
    with sat from 80 to 100
begin
    get the_light
    saturation sat
    set the_light
end
They can also be mixed with the members of groups and locations:
repeat
    in "Table" and location "Living Room"
    as the_light
    with brt from 10 to 80
begin
    brightness brt
    set the_light
end
Here’s an example of a nested loop executed for every known group:
repeat group as grp with brt from 40 to 80
begin
    repeat in group grp as light with c_hue cycle
    begin
        hue c_hue
        set light
    end
end
This loop assigns a different brightness to each group, ranging between 40% and 80%. Within each group, every light gets the same brightness, but their hues are distributed evenly across a 360° range.
Breaking Out of a Loop
You can use a break command to terminate a loop before its normal end
condition is met. The innermost loop is halted, but any outer loop continues
to execute:
repeat 10 with the_hue from 10 to 360
begin
    repeat all as bulb
    begin
        get bulb
        if brigtness > 50
            break
        brightness brightness + 10
        set bulb
    end

    # Execution continues here after the break interrupts the nested loop.
    hue the_hue
    set all
end
A break command outside of a loop is an error that will halt the
compilation of a script.
Retrieving Current Color
The get command retrieves the current settings from a single light:
get "Table"
set all
This script retrieves the values of hue, saturation, brightness, and kelvin from the bulb named “Table Lamp”. It then sets all the other lights to the retrieved color. This has the effect of setting the color of all the lights to match “Table”.
This command works only for lights that have a single color. Its behavior for candle and strip lights is undefined.
A useful pattern for this command is to get a light’s current values, modify one of them, and then update the light. This allows you to effectively change only one setting:
get light
brightness 100
set light
In this example, the light goes to full intensity withou changing colors.
From a multi-zone light, you can retrieve the color of a single zone:
get "Strip" zone 5
If you omit zone with a multizone light, the values are obtained from
zone 0.
# These are equivalent for a multizone device.

get "Strip" zone 0
get "Strip"
Note that you cannot get values for locations, groups, multiple zones, or multiple lights:
# Errors

get "Table Lamp" and "Chair Side"  # Error: more than one light
get all                            # Error: more than one light
get location "Living Room"         # Error: location, not a light
get group "Reading Lights"         # Error: group, not a light
get "Strip" zone 5 6               # Error: multiple zones
Arrays
An array is created with the array keyword. After it has been declared,
the elements can be accessed with numerical subscripts, which are contained in
pairs of square brackets.
Note
This is a new, rather complex addition to the language, and should be considered experimental. If you encounter any problems, we encourage you to log a bug at https://github.com/Bardolph-Automation-Inc/bardolph/issues or send email to info@bardolphauto.com.
The language allows for arrays to have an arbitrary number of dimensions. The size and dimension of an array are static and set when the array is declared. For example, to create a one-dimensional array:
array vector[5]
In this example, the array named vector has 5 elements and can be accessed with subscripts from 0 to 4.
After an array has been created, its elements can be written with assign and
retrieved wherever any other variable is allowed.
array hues[10]
assign hues[5] 120

hue hues[5]
Attempting to access an array with an index that is negative or outside the bounds of its size will fail and cause an error to be logged. If the subscript is a floating-point value, the fraction will be truncated (not rounded) to yield an integer.
To declare a multi-dimensional array, use a series of dimensions, separated by spaces. For example, to declare and access an 8x4 two-dimensional array:
array colors[8 4]
assign colors[1 3] 100
Within the declaration, the size of the array can be calculated at run-tme. However, after an arrary has been declared, its size may not be changed.
array hue_segment[hue / 10]

assign array_size 24 * 60
array day[array_size]
Spaces
Spaces between an array name and the subsequent square brackets have no symantic significance. For example, these two lines are equivalent:
assign arr[2] 5
assign arr [2] 5
Iterating Over an Array
A simple way to iterate over a specific range is to use the repeat with
construct:
array vector[5]

repeat with i from 0 to 4
    assign vector[i] i * 2
To iterate over all of the elements in an array, use a repaeat in
as clause:
array hues[3]
repeat in hues[] as i
begin
    assign hues[i] (i * 120)
end
In this example, the variable i will be given the values of 0, 1, and 2. Note that the empty square brackets are required in the repeat statement, as hues is an array variable.
Similar constructs can be used for multi-dimensional arrays:
array colors[5 4]

repeat in colors[] as color_num
    repeat in colors[color_num] as setting_num
        assign colors[color_num setting_num] 100

repeat in colors[0] as setting_num
    assign colors[0 setting_num] 200

array matrix[6 5 3]
repeat in matrix[] as i
    repeat in matrix[i] as j
        repeat in matrix[i j] as k
            assign matrix[i j k] 500
Assigning One Array to Another
After a varable has been declared as an array, it can be assigned the entirety of another array, expressed with pairs of empty brackets:
array a[10]
array b[3]

assign a[] b[]
This type of an assignment creates an alias and does not make a copy:
array mat[3]
array mat2[]

assign mat2[] mat[]
assign mat2[0] 200

print mat[0]
This will produce the output:
200
Note
As illustrated in the above example, whenever an array variable appears in code, it must be followed by a pair of square brackets. If that pair of brackets is empty, the code refers to the entire array.
When an array is overwritten, its previous contents are discarded:
array a[5]
assign a[3] 20

array b[]
assign b[3] 40

assign a[] b[]
println a[3]
In this example, the output will be:
40
An array can be assigned the result of partially dereferencing another array:
array b[20 30]
assign b[0 5] 100

array a[]
assign a[] b[0]

println a[5]
In this example, the output will be:
100
An array may not be assigned to an element of another array:
array a[3]
array b[2 3]

assign b[1 1] a[0]  # ok
assign b[2] a[]     # error
assign b[] a[]      # ok
In other words, an entire array can have its value replaced, but its elements may be set only to scalar values.
An array cannot be converted to a scalar:
array a[3]
array b[10]

assign a[0] 5       # ok
assign a[] b[]      # ok
assign a 5          # error
Arrays as Parameters
An array can be passed into an routine as a parameter. Within the code for that routine, the array can be written without explicitly giving the lengths of each dimension. However, the code must be written with an awareness of the number of dimensions.
define fill_array with arr[]
begin
    repeat in arr[] as i
    begin
        assign arr[i] i
    end
end

array a[10]
fill_array a[]

array b[10 10]
fill_array b[]  # Error
Because b[] is two-dimensional, passing it into fill_array is an error, which will cause “illegal assignment” error messages to be sent to the log.
Arrays as Return Values
A function can be defined to return either a scalar or an array. Because it returns an array, its name must be followed by an empty pair of square brackets in its declaration. For example:
define return_arr[]
begin
    array a[2]
    assign a[1] 20
    return a[]
end

println [return_arr][1]
Running this code will output
20
As with array variables, references to routines that return arrays must always be followed by a pair of square brackets:
define create[] with size
begin
    array new_array[size]
    return new_array[]
end

array arr[]
assign arr[] [create 10][]
This example has a function returning a partially dereferenced array that is then indexed:
define return_partial[] with arr[] n
begin
    return arr[n]
end

array vec[3 3]
assgn vec[1 2] 1000

array a[]                             # 1
assign a[] [return_partial vec 1][]   # 2
println a[2]                          # 3
This outputs:
1000
Note that a must first be declared as an array (in line 1), or it can not be assigned the return value of return_partial.
Related to this requirement: in lines 2 and 3, the compiler knows that return_partial returns an array. Given that knowledge, the parser checks whether the routine call is immediately followed by square brackets.
In this example, an assign statement in line 3 immediately follows the
routine call, without the brackets. Therefore, the context of that call must be
appropriate for an array. That requirement is met at line 2 because the return
value is assigned to array variable a.
Raw, Logical, and RGB Units
For me, the HSB coordinate system isn’t especially intuitive. For example, if I want bright green lights, I’ll have to look up an angle for the hue, or maybe memorize which angle corresponds to which percieved color. The RGB color space can make this much easier, because I know what red, green and blue look like.
Using RGB
By specifing certain values for red, green, and blue, you can probably make a pretty good prediction of how a color will look. Most people know that a mix of red and green yields yellow, green plus blue gives you cyan, and red with blue produces purple.
With RGB units, each component’s intensity is expressed as a percentage, which can be given as a floating-point number. For example, to make all your lights a somewhat dim purple, you could have:
units rgb
red 50 green 0 blue 50
set all
As another example, to have white light that is rather bright:
units rgb
define brt 80
red brt green brt blue brt
Internally, the VM converts these values to their HSB equivalents before sending them to the lights.
Note that the setting for kelvin works the same for RGB units as it does for the default logical units. In practiced, I’ve found that it’s easy to just set kelvin to 2700 at the top of the script and not bother with it after that.
Using Raw Units
In the case of logical or RGB units, numerical values in scripts are given in units that are intended to be convenient to humans. However, during communication with the lights, those numbers are mapped to unsigned, 16-bit integer values as specified by the LIFX API.
If you prefer to send unmodified numbers to the lights as specified by that API, you can use raw values (and switch back to logical units as desired). “Raw” refers to an integer between 0 and 65535 that gets transmitted unmodified to the lights. These two actions are equivalent:
units raw
time 10000 duration 2500
hue 30000 saturation 65535 brightness 32767 kelvin 2700 set all

units logical
time 10 duration 2.5l
hue 165 saturation 100 brightness 50 kelvin 2700 set all
Note that with raw units, time and duration are rounded to an integer number of milliseconds. With logical or RGB units, time and duration are treated as a floating-point number of seconds.
There’s no limit to the precision of the floating-point value, but because it will be converted to milliseconds, any digits more than 3 places to the right of the decimal point will be insignificant. For example, durations of 2 and 1.9999 are equivalent, while 3 and 2.999 will differ by one millisecond. However, in practice, none of the timing is precise or accurate enough for you to see any difference in behavior for these examples. In my experience, you can’t expect precision much better than 1/10 of a second.
Switching Unit Modes
In general, you’ll probably just pick a mode at the top of your script and not change it. However, if a script does switch modes, some values get re-calculated to preserve the effect on the lights. For example, hue containing 180 in logical units is converted to 32,767 in raw units.
Which settings get changed depends on what kind of transition takes place. For example, when switching from RGB to logical units, there’s no need to convert time or duration. However, hue, saturation, and brightness are initialized, based on the current values of red, green, and blue.
The following table lists which settings are overwritten, and which ones are unaltered, based on what kind of switch occurs:
From |
To |
time, dur. |
hue |
sat. |
brt. |
red |
green |
blue |
|---|---|---|---|---|---|---|---|---|
logical |
raw |
√ |
√ |
√ |
√ |
— |
— |
— |
raw |
logical |
√ |
√ |
√ |
√ |
— |
— |
— |
rgb |
raw |
√ |
√ |
√ |
√ |
— |
— |
— |
raw |
rgb |
√ |
— |
— |
— |
√ |
√ |
√ |
rgb |
logical |
— |
√ |
√ |
√ |
— |
— |
— |
logical |
rgb |
— |
— |
— |
— |
√ |
√ |
√ |
None of the changes in unit mode affect the contents of kelvin. That value
is always considered to be a temperature measured in °K, and never requires
conversion.
Note
While in RGB mode, you can still set the values of hue,
saturation, or brightness. However, this will have no practical effect;
when you set the color of a light, the VM will ignore them. The transition
from RGB to logical or raw mode overwrites the contents of hue,
saturation, and brightness. Conversely, you can set red,
green, or blue, but they are unused if the VM is not in RGB mode.
Similarly, switching to RGB from logical or raw mode overwrites anything
previously stored in those three settings.
Following is an example that illustrates some of this behavior:
units logical
kelvin 2500
time 1.5 duration 1.5
hue 120 saturation 100 brightness 100

units rgb
# red, green, and blue are overwritten:
#   kelvin = 2500
#   time = 1.5
#   duration = 1.5
#   red = 0
#   green = 100
#   blue = 0
#   hue = 120
#   saturation = 100
#   brightness = 100


time 2.5 duration 3.5
red 0 green 0 blue 100
hue 0 saturation 0 brightness 0
units raw
# time, duration, hue, saturation, brightness are overwritten:
#   time = 2500
#   duration = 3500
#   red = 0
#   green = 0
#   blue = 100
#   hue = 43690
#   saturation = 65535
#   brightness = 65535
#   kelvin = 2500
Outputting Text
Three commands, print, println, and printf, send output to stdout.
They all call Python’s own print function, which under most conditions sends
text to stdout, typically the user’s terminal emulator.
Because this is not a general-purpose language, the support for text output is a fairly rudimentary implementation. It pretty much passses data along to the underlying Python print function, aided by the string.format method.
You can print any of the settings, such as hue or brightness, as well
as variables and constants.
The print and println commands take a single parameter, which is
evaluated and sent to stdout. The print command appends a space to its
output, while println and printf each append a line feed.
For example to output some settings:
hue 120 saturation 50 brightness 75 kelvin 2000
println "-----"
print hue
print saturation
print brightness
println kelvin
println "-----"
This would generate the output:
-----
120 50 75 2000
-----
Formatted Output
For any kind of non-trivial output, you’ll probably want to use printf,
which is a pass-through to Python’s string.format() function.
The printf command has the syntax:
printf <format> param
printf <format> param, param, ...
For example, to output the settings:
hue 120 saturation 50 brightness 75 kelvin 2000
printf "{} {} {} {}" hue saturation brightness kelvin
Note that the field placeholders, in the form of {} correspond to the parameters.
Because the compiler relies on the format string to determine the number of parameters, it must be either a literal or a macro.
define fmt "{}"
printf fmt hue
printf "{}" hue

assign fmt2 "{}"
printf fmt2 hue   # Error. Must be a literal or a macro.
It’s possible to use named fields, which can give you cleaner code:
printf "{hue} {saturation} {brightness} {kelvin}"
Named fields can be mixed with anonymous ones:
printf "{hue} {saturation} {brightness} {}" kelvin
The output can contain variables and expressions:
assign x 100
assign y 200
printf "{x} {} {}" y {(x + y) / 2}
This would produce the following output:
100 200 150
The output can also contain light names. Here’s an example that iterates over all of the lights, and outputs the settings for each one:
repeat all as light
begin
    get the_light
    printf "Light: {the_light} {hue} {saturation} {brightness} {kelvin}"
end
The formatting capabilities impelemented by the Python language are rather extensive and complicated. For more information on how this formatting works, I recommend that you consult the Python documentation: https://docs.python.org/3/library/string.html#formatspec
In terms of data types, note that hue, saturation, brightness,
and kelvin are floating-point numbers in logical and RGB modes. In
raw mode, these values are integers. Here’s an example where the light
settings are displayed, first in raw units, and then in RGB units:
define header_fmt "{:<9}{:>9}{:>9}{:>9}{:>9}"

units raw
println "----- Raw -----"
printf header_fmt "Name" "Hue" "Sat" "Brt" "Kelvin"
repeat all as light
begin
    get light
    printf "{light:<9}{hue:>9d}{saturation:>9d}{brightness:>9d}{kelvin:>9d}"
end

units rgb
println ""
println "----- RGB -----"
printf header_fmt "Name" "Red" "Green" "Blue" "Kelvin"
repeat all as light
begin
    get light
    printf "{light:<9}{red:>9.2f}{green:>9.2f}{blue:>9.2f}{kelvin:>9.2f}"
end
Notice that the upper printf uses a format of :>9d, which outputs
number as decimal integers, right-justified in a field 9 characters long. The
RGB numbers are output with 2 decimal points.
When I ran this script on my own lights one evening, I got this output:
----- Raw -----
Name           Hue      Sat      Brt   Kelvin
Bottom       42597    65535    20001     2400
Middle       38957        0    40259     2700
Top          35316    65535    56432     2700

----- RGB -----
Name           Red    Green     Blue   Kelvin
Bottom        0.00     3.05    30.52  2400.00
Middle       61.43    61.43    61.43  2700.00
Top           0.00    66.02    86.11  2700.00
Examples with printf
This code illustrates equivalent behavior using different parameters:
printf "{hue} {saturation} {brightness}"
printf "{} {} {}" hue saturation brightness
printf "{hue} {} {}" saturation brightness
printf "{2} {1} {0}" brightness saturation hue
All of these lines produce the same output. Note that the bottom line in the code uses positional fields, which are a feature of the underlying Python implementation.
Because of the data types of the settings, use of any integer type specifier requires raw mode:
units raw
printf "{:d}" hue   # Ok because hue is an integer in raw mode
printf "{:f}" hue   # Ok because an integer can be converted to float

units logical
printf "{:d}" hue   # ERROR: hue is a floating-point number
Note that light names are Python strings:
println "Furniture group:"
repeat in group "Furniture" as light
    printf "{light:>10s}"

println "Pole group:"
repeat in group "Pole" as light
    printf "{light:>10}"